High Sierra
Backpacking
Trail Guide
Forums
Sierra
Weather
WeatherNotes Northern
Sierra Weather
Gear
High Sierra Backpacking Gear
W-F-G
Getting Started Backpacking
Collecting our
WITS, our FITNESS, and our GEAR
Languages
Trail Skills
Mountain
Safety
Food
Planning
Trail Arts
More
Information
Social
| Trailhead | GEAR PAGE | GETTING STARTED |
LAYERING | BOOTS | UPPER BODY INSULATION |
TRAIL SKILLS |
GEAR FORUM |
NAVIGATION | PLANNING |
| 5 | ||||||
Building If you are just starting to backpack, your first job is to get in If you have already done that, then we've got to build your Finally we'll get out into the field to work out how our body and gear work in nature. |
Your Is your first consideration, not mine. Is your budget an issue? Do you have a propensity to get very cold? Do you have any particular physical issues & injuries that must be considered? You must consider all of the issues that define your personal backpacking gear and training needs. |
|||||
| Thoughts on Getting Started |
||||||
Our Goal is Clear This involves evolving the fitness, skills, and gear necessary. Let's do this. 1st> Start Walking. Find stairs. Jog. Put yourself in motion. 2nd> Plan gear purchases. Study gear. Outfit a car camping setup with gear suitable for backpacking. Start collecting the pack, stove, tent, sleeping bag, and other bits of gear you will need. 3rd> Evolve extensive day hiking into car camping as a prelude to our first overnight backpacking trip. We will evaluate the effectiveness of our gear, clothing, and fitness on overnight car camping trips. Adjust gear as necessary. 4th> Lengthen our next trip a bit. Get Stronger. Get familiar with your gear. Observe how nature and you work together. |
||||||
| Backpacking Fitness | Backpacking Skills |
Building |
|||||
You should look at building your kit as an expression of your personality, your physical capabilities, and your values as a person. These elements determine what gear selections best address each person's capabilities and character. Though these principals guide our approach to selecting gear, only the very real physical requirements of the High Sierras prove our gear selections correct, only field-testing proves our fundamental assumptions are indeed facts. In other words, we've really gotta watch out for any unrealistic, even idealistic, assumptions we may have about what nature can do or about our capacities to endure. We must factually determine our capacities to withstand fatigue and cold, realistically gage the range of cold and fatigue we can potentially experience on our trip, and offset the potential for harsh weather with adequate gear for our personal level of cold resistance. Finally, we must have the experience to properly deploy it. Backpacker's food and gear loading distributes itself along what I call the, "Goldilocks Curve." Backpackers either carry too little, just right, or too much food & gear. Too Little Some of these folks approach simplicity like a religion. Unless you've years of experience backing up your assertions, I'm very very skeptical. A few days of fierce early-Summer cold rains and snow routinely threatens the lives of dozens of under-prepared PCT hikers who enter the South Sierra as early as they can every year. This same light gear setup would be much safer, if still unwise, a month later in the season. Too Much I still laugh when I think about those guys... "you brought the solution to your own problem...use the shovel to bury the skillets and axes..." I am still laughing now as then. Future archeologists will be impressed by our stupidity... The heavy over- packers suffer from the constant pains of a too heavy pack. Exhaustion is also a serious threat in the back country, especially at high altitude. Insufficiently geared backpackers are at the mercy of the weather. Don't fail due to internal miscalculations about your level of fitness or because of external miscalculations about your insulation and shelter needs. Backpackers die when their physical miscalculation about their gear needs lines up with the appearance of a cold Summer storm, just when their miscalculation about the physical demands of the trail are inducing exhaustion. Just Right
The Rookie Hiking Health Plan Assess your level of fitness, your injury history, and the selection of gear you have at your disposal. This assessment will determine the start point of your hunt for gear and the fitness and experience to properly put them all together on High Sierra trails. As I suggest above, non-hikers should set a goal and have a pragmatic plan to achieve fitness. My goal is to gradually get you ready for the hike from Tahoe to Whitney in a logical evolution of fitness, skills, gear and experience.
The Process Physically, you must first recover from the healing phase of the initial injury and be ready for rehabilitation, otherwise known as training. We used to call it work. You must be willing to work. Start with light stretching, light weight-lifting, and short local walks. Carefully monitor the response of the injury. Back off with inflammation and pain, increase work with successful completion of your current level of training. I consider myself totally prepped when I can easily jog 7 miles with a 750 foot elevation gain. This means I will not suffer too much during the transition to heavy pack and high elevation field conditions. If I can run half that distance I will suffer twice as much for twice as long. Gear acquisition is not much less precise a science. Gear selection should be made carefully Gradually bring your hikes to the next level, and launch your day hikes from a free National Forest car camping site along the Sierra Crest. If you are not in proximity to the Sierra Crest, bring yourself to your nearest National Forest location where you can car camp for free. Gear Test There are many free car camping sites on all the more remote Northern trans-Sierra Highways. The goal here is to get you fit, get you some basic gear, and get you familiar with how to comfortably deploy and use that gear one logical step at a time. Oh, and you will watch half of eternity wheel overhead every night, while tracking the routine of daily life in the mountains during the days. After a bit of this day-hiking and car-camping you will put it all on the trail, and know what has already worked for you while car-camping near the Sierra Crest! The Goal There is a method to this madness. The key section of the PCT-TYT across Emigrant Wilderness and the North Yosemite Backcountry is about 75 miles between resupply points. The key section of the PCT-JMT from Muir Ranch to the Whitney Portal is around 132 miles from end to end. The distance vs. time vs. food/pack weight demands of these two key sections determine that 15 mpd is around the minimal capacity necessary to efficiently cross these distances. If we go slower than 15 mpd the increase in food weight will make the overall pack weight unbearable. Especially for the lengthy Muir to Portal section. Our pack will be noticeably lighter if we can maintain 17 or 20 miles per day. This is very very strenuous work at very high altitude up steep mountain trails carrying potentially very heavy pack loads. Oh, and each of these long sections of trail are the hardest sections of both the North and South Sierra, respectively. This difficulty of the work load should not be underestimated. Our long distance backpacking trips across these lengthy sections between resupply points each takes a considerable number of strenous hiking days to complete. This requires we have training and trail plans that prepares us for crossing long distances unassisted while successfully enduring weeks of physical stress and exposure. This level of fitness will give us the capacity to walk around 75 miles on a five day food load. Reaching this level of capacity will be a very important milestone if we are planning to hike the Tahoe to Yosemite, John Muir, or Pacific Crest Trails. Our gear must serve us well for this to happen. The End of the Line is the Advent of Full Access We are fit enough for four-season High Sierra travel, with the addition of the necessary skills. If you have not worked yourself through this process of exploring the limits of your improving fitness while breaking-in a set of boots, of collecting gear and matching gear to your specific needs, of staying warm and (relatively) dry while developing the skill sets necessary to set up your protective tent in high wind and cook a great meal on your little camp stoves in driving rain, you have not yet lived. Every year I meet kids with absolutely no backpacking experience trying to hike the PCT. Wow. Just a little common-sense and preparation would have saved these people a whole lot of suffering. Use the Summertime backpacking gear list as a shopping list. The plan is to have your fitness, your camp skills, your familiarity with a local backpacking area and your gear knowledge all come together simultaneously for a wonderful first backpacking experience. This is especially important for kids and first time backpackers. People who have not accustomed themselves to walking with a backpack are going to have a hard time if you just throw them onto High Sierra trails, and this difficulty is only magnified by altitude and inclination. The Well Cooked Frog Buy Smart My North Face Mountain Jacket, $270 retail, was purchased for $99 as a return from the Berkeley North Face Outlet. I did exactly the same thing with my Winter Mountain Pants. It took me a long time to find the right gear. But this should not be a worry. If you're rolling in bucks, don't let your desires overwhelm you capacities. Don't buy what you don't need or can't use. My philosophy, and yours too, should require that we be personally responsible for always having sufficient shelter, proper insulation, safe water, and copious amounts of good food for the wide range of conditions we can possibly encounter. And, we must be able to provide those resources to a downed backpacker in emergency situations. Some folks take quite a different approach, failing to provide for even their own basic needs. I watch people crash and burn on the long trails every year. And I watch people evolve to find their potential on the long trails. Properly evaluating your fitness and skills against your objectives allows you to bring all three into parity. Never carry too much, never carry too little. Don't bite off more than you can chew and keep your objectives within your capacities. Check out the following gear sections for more information.
THIS PAGE IS UNDER CONSTRUCTION: STAY TUNED FOR MUCH MORE! COME ON BACK NOW, 'YA HEAR? |
Building |
Getting Started Index Getting Started 1) Training/Physical preparation
) Local Trails ) Sierra Trails Getting Started
2a) Pack
2e) Insulation 2h) Gloves ) Misc First aid kit ) Camp Gear
d) Cooking Gear
4) FOOD Getting Started
THIS PAGE IS UNDER CONSTRUCTION: STAY TUNED FOR MUCH MORE! COME ON BACK NOW, 'YA HEAR? |
Your Most Fundamental Piece of Gear is You |
About me: Alex Wierbinski, backpacking bum, age 57, Berkeley California. I remember getting my first backpack in 1966 or so, it was an old school wood and canvas job. I was a Cub Scout. I remember the poncho and peacoat phase, and the invention of gortex. I was not real impressed with synthetics. I buy the best gear that does the job that I can afford. Good sources of affordable gear are the North Face Outlet store, and the REI returns sales, where you can get top quality used gear for low prices. I customize, maintain, repair and replace my gear as necessary. Things Fall Apart Internally, a drug taken to treat my bad knee disturbed my heart rhythm. The disturbed heart rhythm induced a cold weather injury while still undiagnosed. The cold weather injury instability led to a broken leg. SOB! Externally, I loaned my old North Face soft shell internal framed pack, my Winter pack, to a "friend," who promptly lost it. I'm still keeping my eyes open for a replacement, but this was an irreplaceable piece of early North Face gear from the early 1970s. The North Face was my Winter and Climbing pack. (Got one!) Externally, I have no Winter pack (replaced), and my Summer pack is hurting (fixed), the source of my energy, my heart, is misfiring, and the leg with the bad knee is now matched with a leg broken at the ankle joint. Putting It Back Together I feel as if I am juggling at the Gates of Doom. These goals require a careful application of increasing range of motion, strengthening, and endurance work coupled with careful observation of the effects of work on the damaged parts. The inflammation and pain of rehabilitation must be controlled by never overworking our damaged parts, or otherwise risking reinjury. We must carefully find and expand our limits. I figure that during the next three years I will probe and discover the limits of restoring my cardiac and physical potentials step by careful step. When in top shape our physical output for unit of pain experienced is maximal. For the Beginning Backpacker I began my adult backpacking life day hiking into the Sierra during Winter, probing Christmas (Long) Valley with exciting day hikes in the late 1980's and early '90's, after a friend moved up to Meyers in the South Lake Tahoe Basin. I was hooked. These experiences drew me into backpacking the Sierra Nevada during Summertime with the clear goal to get in during Winter ASAP. Back then the Sierra was a Winter Wonderland, and would occasionally turn into a Crystal Wonderland. I started with the same basic wool insulation and shell layers that I had last used as a Boy Scout backpacker in the early 1970s. This gear is still sufficient for Summer Backpacking, but is very heavy! I am what would be called a heavy-weight backpacker Winter gear is heavy. These experiences affected how I judge gear. As it is a given that a Winter pack is heavy, and travel in snow is difficult, I soon considered Summer trips as good training and scouting for Winter travel. Thus I have regularly carried Summer packs in excess of 60lbs, and sought out cross country and scrambling routes. On August 28, 2009, I exited the Whitney Portal ending my 4th complete Lake Tahoe to Mount Whitney trip. There's a hang scale on the wood structure marking the Whitney Portal Trailhead. My pack weighed 37 lbs with not a bit of food in it. After returning to the Bay Area and not enjoying "civilization" for a couple of weeks after finishing my TW backpacking trip, I packed two weeks of food into my already heavy pack and walked from Meeks Bay to Tuolumne Meadows along the TYT. I enjoyed civilization more after that hike beat the heck out of me!
|
Observe-Analyze-THINK!-Engage |
|||||||||
Reflections of Gear Your Gear choices define your knowledge of the wilderness, how you view the power of nature, and will be highly predictive of the outcomes of your backpacking experiences over time and changing conditions. Take What You Need Gear selection sets the tone of your backpacking trip. If you are too heavily laden for your planned mileage, just plain over packed or too weak, you will be painfully slow and will struggle trying to make the high daily mileage long distance backpackers are required to cover. Rather than being a danger, these conditions were delights.
Packing light Ultralight Dangers Though you specifically may get through while under equipped, the significant percentage of under equipped PCT and JMT who hit the trail every year assures that the rate of rescues and the occasional fatalities we currently experience will continue. Don't Become a Statistical Idiot One recipe for disaster in early or late Summer is the gear combination of sandals or light tennis shoes, a tarp (rather than a tent), poor upper and lower body insulation, and a lightweight 40° bag. We must be aware of the range of weather threats we potentially face, and carry the gear necessary to cope with the worse Nature can throw down. Gear Longevity and Toughness A member of TW is starting a custom lightweight backpack manufacturing company. They look really good.
Explore Weather Volatility I always bring "camp" or "fording" tennis shoes that bring great comfort Your Life is on the Line WHAT AN ASS! NEVER make these STUPID mistakes. ALWAYS bring the gear for the range of weather you may experience in the High Sierras. Do not venture into potentially extreme circumstances until you have developed the experience to USE that gear properly in extreme circumstances. If you can and do call in rescue you must make contact with a Ranger or SAR folks ASAP upon reaching safety to confirm the end of your danger. The High Sierras can be a harsh mistress, even during Summertime, and yet it is most beautiful in its extremes. If you are properly prepared you will still suffer a bit to experience the beauty. Temperatures can drop radically, and the unprepared can be put into mortal danger. New Don't become an example of self-delusional stupidity in the High Sierras. Nature does not operate by your understanding of it. You do. If you misanalyize yourself, or your environment, you will certainly suffer, and you may die. On the positive side, we were made to operate and navigate in all environments, in all weather conditions, while traveling under heavy load while chasing or being chased. You just have to pick up and develop these internal and external skills and capacities before throwing yourself into Nature's "Deep End." If that's what you are looking to do, to throw yourself into nature as logically and safely as possible, then this site was made for you. |
This Section is Under Construction! |
||||||||
Gear SelectionsThe Basic Set-Up Building your KitBoot BasicsUpper BodyLower Body
Gear Seasons List Summer Spring & Fall Winter
|
|||||||||
Introduction
to
Layering and Insulation
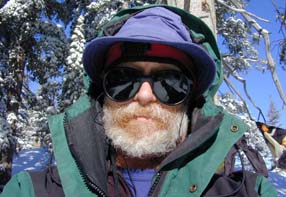
Layering Our upper body insulation is composed of three fundamental Layers: Base, Insulation, and Shell. Layers for every Day, and Layers for every Season I employ a seasonal, as well as a trip by trip approach to base-layering. I carefully choose the proper base layer, insulation layers, and shell layer for the season and the range of wilderness weather I can possibly encounter. The goal is to remain warm while backpacking and when stationary in camp. In camp during the night we should be able to stay warm and dry wearing all our layers in our sleeping bag inside our tent during the worst weather the season can throw down. For example, my Spring and Fall gear kits are composed of my Summer gear combined with the additional insulation required to deal with the declining temperatures and increased storm activity during Spring and Fall. On the other hand, my Winter gear kit completely replaces many of the lighter elements of the Summer-Spring-Fall kit with much heavier gear appropriate for Winter in the High Sierras. These replacements include a heavy outer shell, heavy boots, and thick gloves. Clear Day after Winter Storm, '07
Above: Heavy Winter Gear. Visible: Heavy outer shell, fleece coat, long sleeve light weight polyester. Ear warmer band, sunhat, fine REI sunglasses. Not seen: Wearing polyester thin tank top. Two insulation layers still in pack: Medium weight poly upper, down coat. Gear drying in background. |
Our Base Layer Our base layer is the layer that sits next to our skin. This is the layer that we will wear for the duration of our trip. Our base layer must reflect the fundamental degree of insulation we require for daily travel through the terrain. Our base layer is our fundamental protection against the elements, and must accurately reflect the conditions we will experience. The standard role of our base layer is to keep us in the comfort zone while under a full backpacking work load. During Summer, late Spring, and early Fall my base layer is a pair of nylon zip to shorts pants, and a thin polyester tank top. This thin base layer reflects the huge amount of heat that we generate carrying pack in the Sierras. This base layer can be instantly supplemented by the required additional layers: if the temps drop or the winds pick up the long-sleeved poly is instantly applied. Rain brings out the shell. Layers are added to or removed from the base layer as necessary. During late Fall and early Spring I begin employing a thin polyester thermal base layer on both upper and lower body. If the conditions are really cold, I supplement that with a second medium weight polyester layer. These are the layers that I plan on hiking in, so if I over-layer, I will have to strip a layer off to avoid sweating out during exertion. Note that your base layer is NOT designed to keep us warm when stopped, only to keep us comfortable while hiking, while generating heat. In Summertime, early Fall, and late Spring my lower body base layer is Zip to Shorts nylon pants. more |
|||||
Our Insulation Layer Our insulation layers sits between our base layer and our shell, and are only deployed as necessary. Our insulation layers must reflect the degree of insulation we will require at our coldest while generating no work heat. This would be while sitting in camp at night during the worst conditions the Sierras can throw at us. In Summer time, my lower body insulation layers consist of one additional layer above my zip to shorts pants: Medium weight fleece pants. |
||||||
Our Shell Layer Our shell is our external wind and water proof layer. A degree of insulation in the shell is nice in especially cold conditions. Serious high winds at low temps cut right through light and medium shells. Never rely on light weight gear in mid-Winter in the High Sierras. There is a point in each snowy Spring when the temps rise, and the Winter shell can begin to be replaced with the lighter-weight gear. If you are unsure about seasonal change in the Sierras, always bring the heavier gear. |
||||||
Backpacker ForumsHave a great Sierra Nevada route or trip to relate?Post it on Experiences, comments, or pictures about this Section: Let it Rip HERE:Gear Forum |
Trailhead
Contact
Alex Wierbinski
Backpacking Lake Tahoe to Mount Whitney
Your guide to the High Sierra Crest, including the Tahoe to Yosemite, Pacific Crest, and John Muir Trails