
Backside of Leavitt Peak
High Sierra
Backpacking
Trail Guide
Forums
Sierra
Weather
WeatherNotes Northern
Sierra Weather
Gear
High Sierra Backpacking Gear Guide
Lower Body Insulation
Languages
Trail Skills
Mountain
Safety
Food
Planning
Trail Arts
More
Information
Social
| HOME PAGE | GEAR PAGE | GETTING STARTED |
LAYERING | BOOTS | UPPER BODY INSULATION |
TRAIL SKILLS |
GEAR FORUM |
WEATHER | PLANNING |
| Al's High Sierra Gear List Lower Body Insulation |
|||
| Lower Body | Summer | Spring and Fall | Winter |
Base Layer |
100% Nylon |
Option |
Add |
Insulation Layer |
Medium Weight |
Option Add |
Add Add |
| Shell Layer | Lightweight wind/water proof shell lower | Replace Lightweight Shell with Heavy Winter Mountain Pants |
|
| Notes | The key is knowing when in Fall to bring a heavier shell, and when in Spring you can lighten your lower shell. | ||
| Lower Body Insulation Gear Forum | |||
Introduction
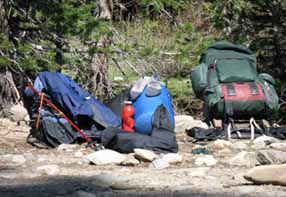
Layering Our upper body insulation is composed of three fundamental Layers: Base, Insulation, and Shell. Layers for every Day, and Layers for every Season I employ a seasonal, as well as a daily approach to base-layering. I carefully choose the proper base layers, insulation layers, and shell layers for the season and the range of wilderness weather conditions and temperatures I can possibly encounter during my daily hiking. The goal is to remain warm while backpacking, and when stationary in camp. In camp during the night I should be able to stay warm and dry wearing all my layers in my sleeping bag inside my tent during the worst weather and cold conditions the season can throw down. For example, my Spring and Fall gear kits are composed of my Summer gear combined with the additional insulation required to deal with the declining temperatures and increased storm activity during Spring and Fall. On the other hand, my Winter gear kit completely replaces some of the lighter elements of the Summer-Spring-Fall kit with much heavier gear appropriate for Winter in the High Sierras. These replacements include incrementally heavier base, insulation, and outer shell layers, as well as a progression of heavier boots, thicker gloves, and more protective head gear. Clear Day after Spring Rain, '09
Above: Medium weight Spring/Fall Gear drying in the sun. |
Our Base Layer(s) Our base layer is the layer that sits next to our skin. Our base layer must reflect the degree of insulation we require for daily travel on the trails. Our base layer is our fundamental protection against the elements. During Summer, Spring, and Fall my base layer is a pair of nylon zip to shorts pants, and a thin polyester tank top. During colder Spring and Fall conditions I employ a thin polyester thermal base layer on my lower body. If it is really cold, I supplement that with a second medium weight polyester layer. During Winter I use essentially the same base layers, but replace the insulation layers with heavier materials to suit the level of cold. Note that our base layer is NOT designed to keep us warm when stopped. The base layer is only to keep us comfortable while hiking. When we stop to make camp or take breaks and food we will have to immediatly employ the required extra layers to maintain warmth. In Summertime, early Fall, and late Spring my lower body base layer is Zip to Shorts nylon pants. more |
|||||
Our Insulation Layers Our insulation layers sits between our base layer and our external shell. I bring two layers of lower body insulation during Wintertime. These consist of a poly layer and fleece pants. Each of these layers can be "light" or "heavy," depending on the season and conditions. In Summer time my lower body insulation layers consist of one additional layer above my zip to shorts pants: The medium weight fleece pants. If that is not enought I put on the shell. |
||||||
Our Shell Layer Our shell is our external wind and water proof layer. During Summer an ultralight approach is sufficient for both upper and lowers, but a medium weight coat and pants may be substituted. Serious high winds at low temps cut right through light and medium shells. Never rely on light weight gear in mid-Winter in the High Sierras. There is a point in each snowy Spring when the temps rise, and the Winter shell can be replaced with the lightweight gear. If you are unsure about seasonal change in the Sierras, always bring the heavier Winter Gear. |
||||||
ConsiderationsThere are many manufacturers, styles, and minor variations of each piece of gear depicted in this trail guide. What works best for you depends on you. Backpackers come equipped with different tolerances for cold. Picking the right insulation layers for the season means you must properly access not only the range of weather that you may encounter, but also your own degree of cold tolerance. Many badass women backpackers have a real sensitivity to cold. If you are sensitive to cold, then don't hesitate to bring the insulation you need to stay warm. For cold-sensitive women a down coat during the Summer can make the difference between a fun trip and a freezing bummer. The most important issue is not the brand you buy, but having gear that works for your needs. The goal is to have the perfect layers to easily keep warm during the rapid changes in temperature during each day, as well as being prepared for the radical changes in the High Sierra weather you may encounter during your stay in the mountains. The next consideration is workmanship and wear. Check the workmanship of any insulation you buy. Make sure the materials, stitching, and design are adequate for your use. Always inspect your regular gear for damage before you head off into the mountains for a backpacking trip. It sucks to have something go wrong that you could have easily fixed before the trip. The third consideration is ease of use. Can you get your lower shell on over your boots when it begins to rain or snow? If not, you will be cursing as you struggle to get your lowers on as rain is pouring down. Will your tarp keep you sheltered if 50 mph winds blow rain sideways? If not, you will be cursing as you get drenched. Finally, will all of your layers keep you warm at night while stationary in camp? Levi's, cotton shirts, cotton pants, and cotton thermals are not proper backpacking gear for the High Sierras. |
REI Zip to Shorts Pants
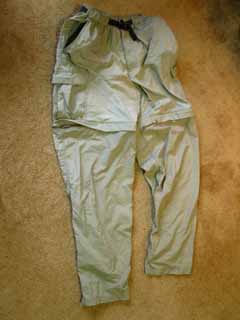 |
Can't say enough good things about this style of pants. Light, with decent insulating qualities, great pockets, and best of all the legs zip off to make shorts. As it is not unusual to experience hot periods during mid-Summer in the High Sierras, shorts are mandatory during mid Summer in the Sierras. These pants work well on chilly mornings, and zip-off to accommodate the rising temps of a sunny day. I occasionally find cheap poly pants cut well for hiking. But then I have to bring, and change into and out of shorts. |
Summer Base Layer: Nylon Zip to Shorts Pants |
|
REI Medium Weight Fleece Pants
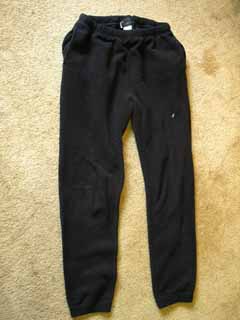 |
I love my fleece pants. Lightweight, warm, and warm when wet. These babies come with me year-round, along with my fleece jacket. When I get into camp these are the first layer that goes on over the zip-to shorts pants as the evening chill sets in. As temps plunge, the next layer to go on is the Shell Layer. That's my summer lower layering: Zip to Shorts pants, Fleece pants, and lightweight lower shell. |
Summer Insulation Layer: Fleece Pants |
|
Marmot Precept Lower Shell
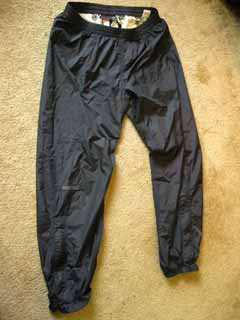 |
Marmot Precept rain pants. Very light, basic no-liner water and wind proof. Problem: the waterproof layer just up and peeled off after a couple of years. This happened on both the upper and lower shells. The water-proof liner peeled right off along the line where the hood of jacket lays over the back of the jacket. I don't mind wearing out gear, but these pieces were not durable enough to handle even hanging in the closet. I was pretty cheesed when the jacket's insulation peeled off from the hood's fold line. |
Summer, early Fall, late Spring: Lightweight Shell Lower |
|
REI Thin Poly Base Layer
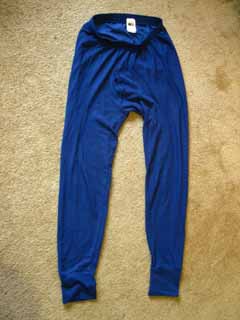 |
Lightweight poly pants. These are my base insulation layer for late Spring, early Fall, and Winter. When the temps go down, these pants become my base layer. They are too much of a hassle to put on under the Zip-to-Shorts pants, and they will not fit over them, so I do not bring this layer on Summer trips. If I want another layer of Summer insulation, I bring the medium poly pants, below, because they go on over the Zip-to-Shorts pants, and below the fleece pants. |
Base Layer, Winter: Lightweight Poly Lowers |
|
REI Thick Poly Insulation Layer
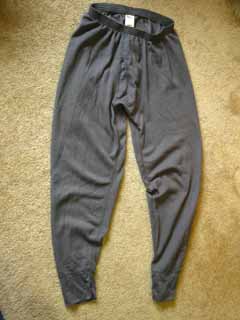 |
These babies only come out in Winter, or if temps look low in late Fall or early Spring. If you run cold during Summer, these mid weight poly pants will do you a lot of good. |
2nd Winter Layer, Optional in Fall and Spring: Medium Weight Poly Lowers |
|
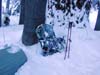
Gaiters
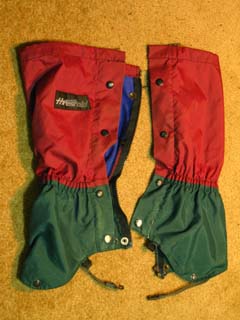 |
I don't employ gaiters unless I am rain or snow camping. These are heavy Winter gaiters, required for any travel through deep snow or snow storms. |
Gaiters |
|
North Face Very Heavy Lower Shell
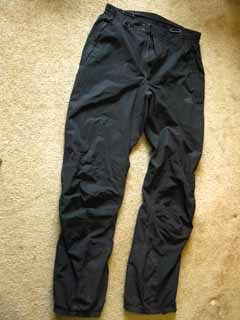 |
If you are venturing into the High Sierras in Winter time you are going to need a quality heavy Winter shell. Like my North Face mountain jacket, I picked up these $229 pants for $99. at the North Face Outlet, as a return. Their only shortcoming is that the lower leg zippers could rise higher up the leg. Always check that when you buy a lower shell. A longer zipper would make changing into and out of these pants easier. Other than that they provide excellent mid-Winter protection during the worse weather. |
Heavy Weight Shell: Winter |
|
Last page: Upper Body Insulation Next page: Trail Skills
Final Thoughts on lower backpacking insulation layers |
Making the proper selections from the insulation elements above should allow you to put together a fine combination of layers to handle any circumstance the High Sierras can throw at you. The key to success is to properly evaluate your personal insulation needs, the possible range of weather conditions of the season you are backpacking in, and intergrate that gear with the skills to properly access the conditions, and effectively utilize your shelter. THIS PAGE IS UNDER CONSTRUCTION: STAY TUNED FOR MUCH MORE! COME ON BACK NOW, 'YA HEAR? Next page: |
Backpacker ForumsHave a great Sierra Nevada route or trip to relate?Post it on The Forums are broken down to cover High Sierra Backpacking Trails and Topics:
Experiences, comments, or pictures about gear we should hear about?Gear Forum |
Trailhead
Contact
Alex Wierbinski

Backpacking Lake Tahoe to Mount Whitney
Your guide to the High Sierra Crest, including the Tahoe to Yosemite, Pacific Crest, and John Muir Trails